Reclining Bound Angle Pose
- At November 02, 2021
- By Daniel
- In Asana, Health & Wellness, Yoga Benefits
 0
0
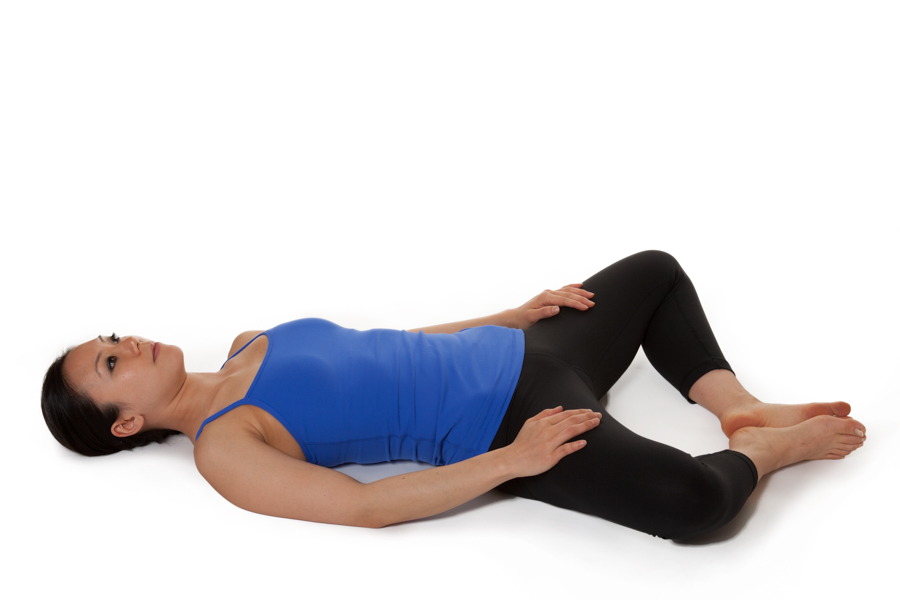 Reclining Bound Angle Pose can be done by itself or combined with Bound Angle and Extended Bound Angle poses. These poses work the same muscles and provide many of the same physical and mental health benefits.
Reclining Bound Angle Pose with props is also a popular relaxation pose that most people can maintain for up to an hour.
If your knees do not touch the floor, rest them on a folded towel or blanket, or on blocks.
English Name: Reclining Bound Angle Pose
Sanskrit Name: Supta Baddha Konasana
Difficulty Level: 3
Start Position: Bound Angle Pose
Instructions:
Step 1.
From Bound Angle Pose, release your hands from your feet and walk your elbows behind you until you are lying on the floor.
Step 2.
Place your hands on your thighs or by your side.
Step 3.
Hold the pose for several breathes, or as long as it feels comfortable.
Step 4.
To get out of the pose, either use your arms to walk your body to a seated position or roll over to one side and use your hands to come to a seated position.
Physical Benefits:
- Stretches leg muscles
- Opens up the chest
- Reduces fatigue
- Relieves headaches
- Improves digestions & circulation
- Maintains urinary tract health
- May prevent varicose veins
Mental Benefits
- Reduces stress
- Increases focus
- Relieves mild anxiety & depression
Contraindications:
- Knee, hip, or groin injury
- Arm, elbow, or hand injury
- Low back pain or injury
Supported Reclining Bound Angle Pose

Props
1 strap
1 Bolster
2 Blocks or blankets
1 neck pillow or rolled up towel
1 eye pillow or mask (optional)
Extended Bound Angle Pose
- At October 05, 2021
- By Daniel
- In Asana, Health & Wellness, Yoga Benefits
 0
0
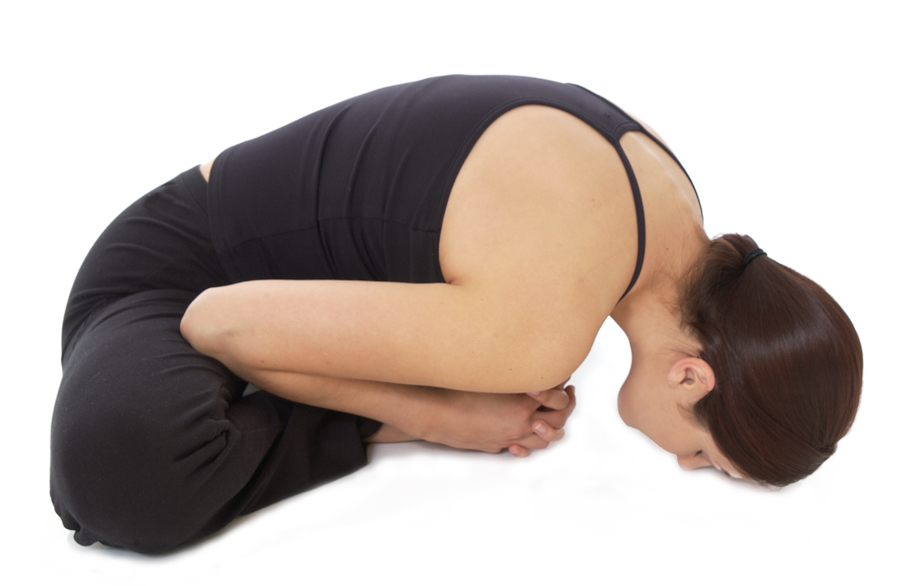
Extended Bound Angle Pose is an extension of Bound Angle Pose that helps stretch the spine and neck muscles. Like Bound angle pose, if you do not have the flexibility to rest your forehead on the floor rest it on a block or folded blanks to prevent neck strain.
English Name: Extended Bound Angle Pose
Sanskrit Name: Utthita Buddha Konasana
Difficulty Level: 2
Start Position: Bound Angle Pose
Instructions:
Step 1.
Inhale. Exhale and fold forward, while keeping your feet as close to your body as possible, until your forehead rests on the floor.
Step 2.
Hold the pose for several breathes or as long as it feels comfortable.
Step 3.
Return to Bound Angle Pose or Staff Pose. Repeat if desired.
Physical Benefits:
- Tones abdominal muscles
- Lengthens the spine
- Improves circulation
- Opens up the chest
- Improves leg and spine flexibility
- Strengthens legs, arms, and torso
- Improves digestions
Mental Benefits
- Reduces stress
- Improves focus
- Relieves mild anxiety & depression
Contraindications:
- Leg, knee, foot, or ankle injury
- Spinal injury
- Headache
- Migraine
- Injured or sore coccyx (tail bone)
Bound Angle Pose
- At September 07, 2021
- By Daniel
- In Asana, Health & Wellness, Yoga Benefits
 0
0
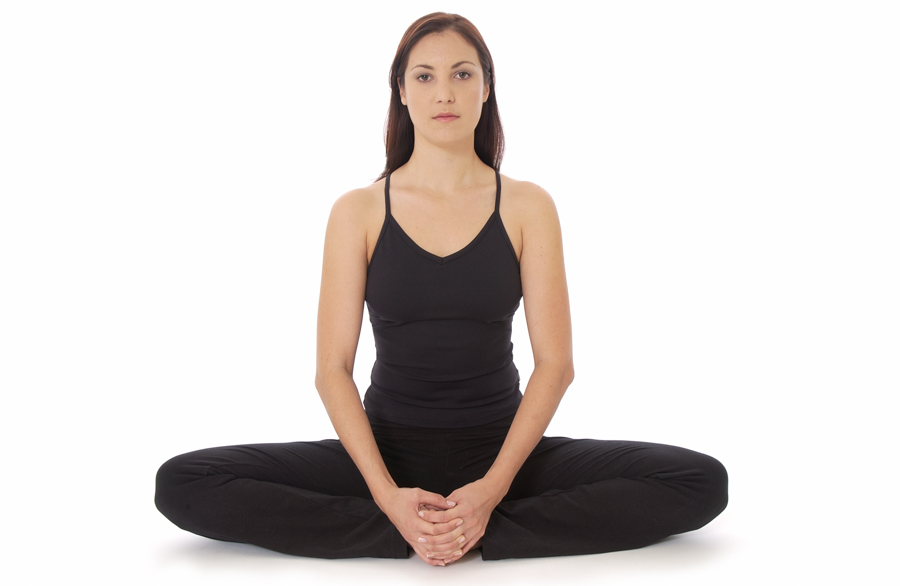
Bound Angle Pose is a seated pose that measures your hip and leg flexibility. Bound Angle can be used instead of Lotus for mediation. Many people do not have the flexibility to bend their legs to the floor. That is OK. In time, your flexibility will increase the more you do the pose. If you are not to the point where you can do the pose as pictured, rest your knees on blocks or a folded blanket to relieve the strain on your hips.
English Name: Bound Angle Pose
Sanskrit Name: Buddha Konasana
Difficulty Level: 2
Start Position: Staff
Instructions:
Step 1.
From Staff pose, bend your knees and draw your feet as close to your body as possible.
Step 2.
Holding both feet with your hands open your knees out to the side. Maintain a straight spine.
Step 3.
Hold the pose for 4 or 5 breathes, or as long as it feels comfortable.
Step 4.
Return to Staff pose and repeat if desired.
Physical Benefits:
- Tones abdominal muscles
- Elongates spine
- Improves circulation
- Opens up the chest
- Improves leg and spine flexibility
- Strengthens legs, arms, and torso
- Improves digestions
Mental Benefits
- Reduces stress
- Improves focus
- Relieves mild anxiety & depression
Contraindications:
- Leg, knee, foot, or ankle injury
- Headache
- Migraine
- Injured or sore coccyx (tail bone)
Eight Angle (Astavakrasana)
- At May 05, 2020
- By Daniel
- In Asana, Yoga Benefits
 0
0
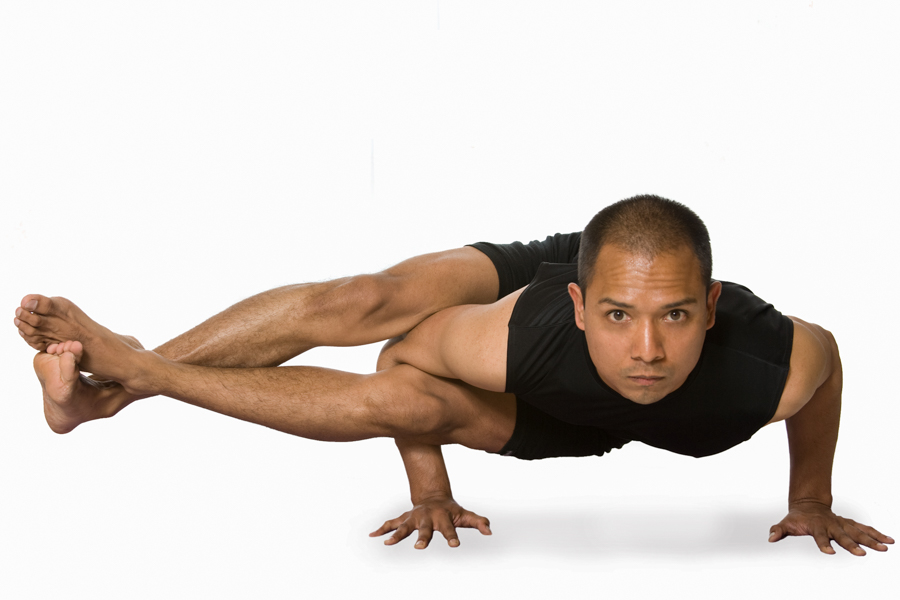 Frog pose takes Reclining Hero pose and turns it on its stomach rather than back. If you can do Reclining Hero you can do Frog. Frog adds extending your check like Cobra pose and grasping your feet with your hands. While Cobra and Reclining Hero have a difficulty level of 4, Frog increases the difficulty level to 6 giving your arms, back, and legs a good stretch.
Like all hatha yoga asanas, always listen to you body to prevent injuries.
English Name: Eight Angle
Sanskrit Name: Astavakrasana
Difficulty Level: 7
Start Position: Easy Sitting
Instructions:
Step 1.
Hook your right shoulder under your right knee and extend your left leg forward on the floor.
Step 2.
Place both hands on the floor on either side of your left thigh.
Step 3.
Pressing into your hands, lift your buttocks off the floor while hooking your left ankle over your right ankle.
Step 4.
Bend your elbows, move your chest forward, extend your legs to the right, and gaze forward.
Step 5.
Hold the pose as long as it feels comfortable. Release. Return to Easy Sitting, and repeat on the other side
Physical Benefits:
- Stretches leg, arm, and shoulder muscles
- Opens up the chest
- Improves lung capacity
- Improves digestions
- Increase leg and arm strength
Mental Benefits
- Reduces stress
- Improves thinking
- Increases focus
Contraindications:
- Arm, wrist, shoulder, or leg injury
- Neck injury
- Carpel tunnel syndrome

