Cord Pose
- At December 06, 2022
- By Daniel
- In Asana, Education, Health & Wellness
 0
0
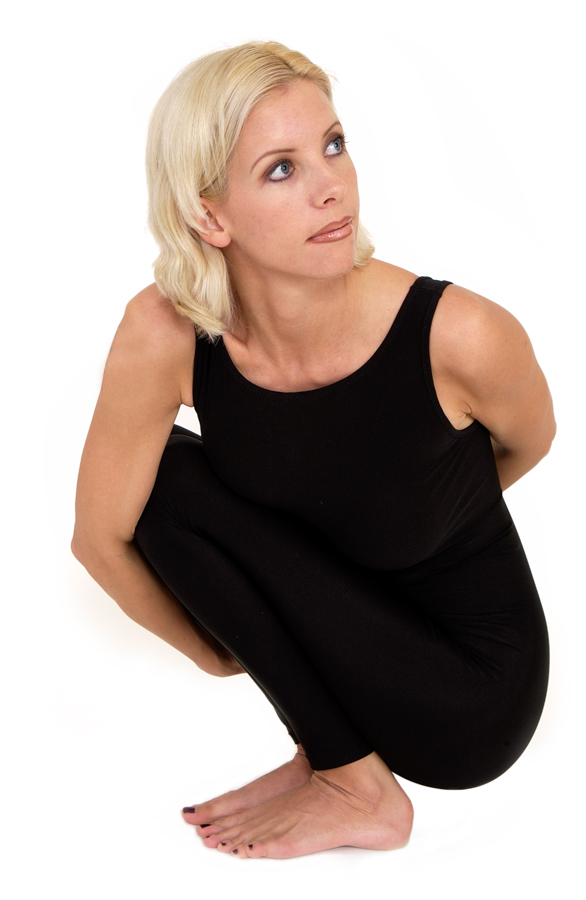 Cord pose continues our serious of balance poses. Good balance is important as one grows older. Falls are a leading cause of death among the elderly.
You can do Cord pose from Garland 1 or Mountain poses.
In addition to improving balance, Cord pose stretches arm and leg muscles, relieves neck stiffness, and improves focus and concentration.
English Name: Cord
Sanskrit Name: Pasasana
Difficulty Level: 5
Start Position: Garland 1
Instructions:
Step 1.
From Garland 1, place your knees and feet together and twist your body to the left.
Step 2.
Hook your right shoulder outside of your left thigh and place your left arm behind your back.
Step 3.
Grab your your left wrist with your right hand. Use a strap if you cannot reach your wrist.
Step 4.
Hold the pose for 4 or 5 breathes, or as long as it feels comfortable. Release and return to Garland 1. Repeat on the other side if desired.
Physical Benefits:
- Stretches the spine
- Strengthens arms and wrists
- Improves balance and upper body strength
- Opens the hips
- Relieves sciatica
- Tones abdominal muscles
- Improves digestion
- Relieve constipation
- Strengthens feet and ankles
- Relieves knee stiffness
Mental Benefits
- Reduces stress and anxiety
- Improves focus
Contraindications:
- Wrist, arm, or shoulder injury
- Back injury
- Ankle, hip or knee injury
- Leg, arm, or back injury
Garland 1
- At November 01, 2022
- By Daniel
- In Asana, Education, Health & Wellness
 0
0
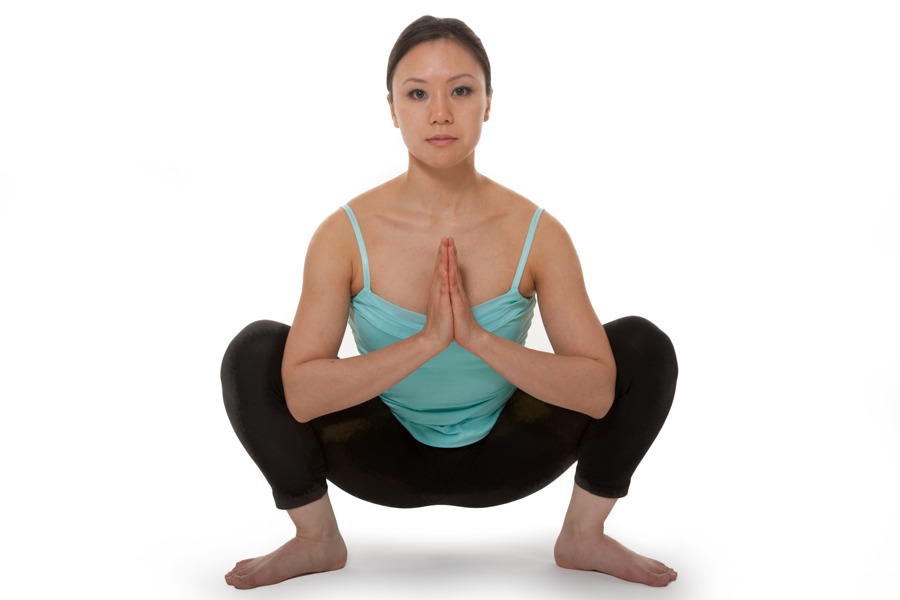 Garland I takes you from a standing pose (Mountain) to a squatting balance pose.
Garland I may appear to be a simple pose, but it is still a balance pose that requires concentration (focus) to maintain your balance. It also strengthens your legs while providing numerous physical and metal benefits.
English Name: Garland 1
Sanskrit Name: Malasana I
Difficulty Level: 4
Start Position: Mountain Pose
Instructions:
Step 1.
From Mountain pose, place your feet about 2-feet (60 cm) apart and squat in between your thighs.
Step 2.
Bring your hands to prayer position (pranamasana) at your hearth.
Step 3.
Hold the pose for 4 or 5 breathes, or as long as it feels comfortable. Release and return to Mountain pose. Repeat if desired.
Physical Benefits:
- Stretches the spine
- Strengthens arms and wrists
- Improves balance and upper body strength
- Opens the hips
- Relieves sciatica
- Tones abdominal muscles
- Improves digestion
- Relieve constipation
- Strengthens feet and ankles
- Relieves knee stiffness
Mental Benefits
- Reduces stress and anxiety
- Improves focus
Contraindications:
- Wrist, arm, or shoulder injury
- Back injury
- Ankle, hip or knee injury
- Leg, arm, or back injury
Upward Cock Pose
- At October 04, 2022
- By Daniel
- In Asana, Education, Health & Wellness
 0
0
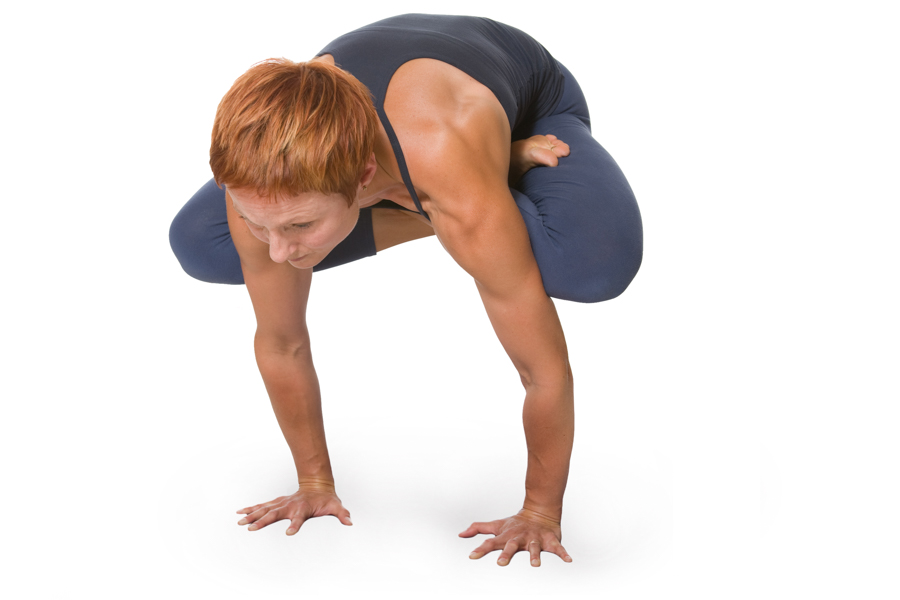 Although Upward Cock pose has the same difficulty level as Side Cock, you may find it easier to get into and maintain Upward Cock.
Like Cock and Side Cock poses, if you are unable to get into Lotus pose or hold Lotus pose more than a few seconds, Upward Cock pose may be too challenging for you.
Upward Cock pose provides the mental and physical benefits of Cock and Side Cock poses.
English Name: Upward Cock
Sanskrit Name: Urdhva Kukkutasana
Difficulty Level: 9
Start Position: Seated Lotus
Instructions:
Step 1.
From Lotus pose, bring your knees towards your chest and place both hands on the floor in front of you.
Step 2.
Bend your arms and place your skins into your triceps (upper arm muscles).
Step 3.
Lean your body forward and straighten your arms balancing on your hands.
Step 4.
Hold the pose for 4 or 5 breathes, or as long as it feels comfortable. Slowly lower your legs to the floor and return to seated Lotus. Repeat if desired.
Physical Benefits:
- Stretches the spine
- Strengthens arms and wrists
- Improves balance and upper body strength
- Increases hip and knee flexibility
- Opens up the hips
- Tones abdominal muscles
- Improves digestion
Mental Benefits
- Improves mental acuity
- Reduces stress
Contraindications:
- Wrist, arm, or shoulder injury
- Low back injury
- Ankle, hip or knee injury
- Leg, arm, or back injury
Side Cock Pose
- At September 06, 2022
- By Daniel
- In Asana, Education, Health & Wellness
 0
0
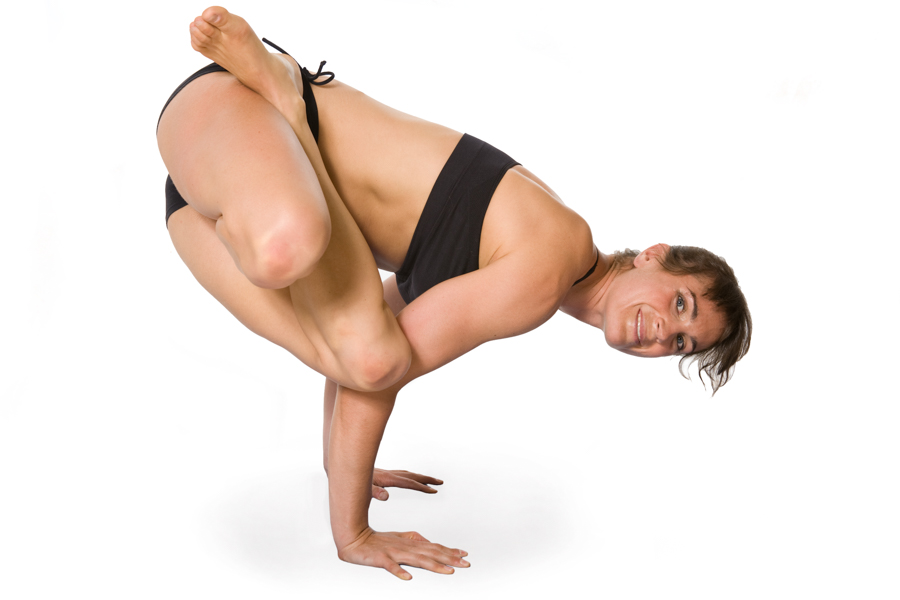 Side Cock pose is a more advanced balance pose than Cock pose. Like Cock Pose, Side Cock is a hand balance pose. In requires concentration (focus) and good upper body arm strength. The hands and arms are used to lift one off the floor. Unlike Cock Pose, your center of gravity is shifted to one side increasing the difficulty obtaining and maintaining your balance.
Like Cock Pose, if you are unable to get into Lotus pose or hold Lotus pose more than a few seconds, Side Cock pose may be too challenging. Side Cock pose provides the mental and physical benefits of Cock pose.
English Name: Side Cock
Sanskrit Name: Parsva Kukkutasana
Difficulty Level: 9
Start Position: Seated Lotus
Instructions:
Step 1.
From Lotus pose, twist your body to your right side and place both hands on the floor.
Step 2.
Transfer your weight to your hands and lift your legs hooking your left thigh onto your right tricep (area above elbow).
Step 3.
Lean your body forward and straightening lower arms balancing on your hands.
Step 4.
Hold the pose for 4 or 5 breathes, or as long as it feels comfortable. Unhook your legs and return to seated Lotus. Repeat twisting to your left side if desired.
Physical Benefits:
- Stretches the spine
- Strengthens arms and wrists
- Improves balance and upper body strength
- Increases hip and knee flexibility
- Opens up the hips
- Tones abdominal muscles
- Improves digestion
Mental Benefits
- Improves mental acuity
- Reduces stress
Contraindications:
- Wrist, arm, or shoulder injury
- Low back injury
- Ankle, hip or knee injury
- Leg, arm, or back injury
Cock Pose
- At August 02, 2022
- By Daniel
- In Asana, Education, Health & Wellness
 0
0
 Cock pose transforms a seated meditation pose (Lotus) to a hand balance pose. In addition to flexibility, one needs good upper body arm strength. The hands and arms are used to lift one off the floor. If you are unable to get into Lotus pose or hold Lotus pose more than a few seconds, Cock pose may be too challenging. Cock pose provides the mental and physical benefits of Lotus pose plus increasing balance, wrist and upper body strength.
English Name: Cock
Sanskrit Name: Kukkutasana
Difficulty Level: 8
Start Position: Seated Lotus
Instructions:
Step 1.
Thread your arms under your knees while keeping your legs in Lotus pose.
Step 2.
Lean your body forward, and place your hands flat on the floor energizing through your spread fingers.
Step 3.
Straightening your arms to left your buttocks and legs off the floor.
Step 4.
Hold the pose for 4 or 5 breathes, or as long as it feels comfortable. Slowly lower your buttocks and legs to the floor. Repeat if desired.
Physical Benefits:
- Stretches the spine
- Strengthens arms and wrists
- Improves balance and upper body strength
- Increases hip and knee flexibility
- Opens up the hips
- Tones abdominal muscles
- Improves digestion
Mental Benefits
- Improves mental acuity
- Reduces stress
Contraindications:
- Wrist, arm, or shoulder injury
- Low back injury
- Ankle, hip or knee injury
- Leg, arm, or back injury
Cobra Pose (Bhujangasana)
- At July 05, 2022
- By Daniel
- In Asana
 0
0
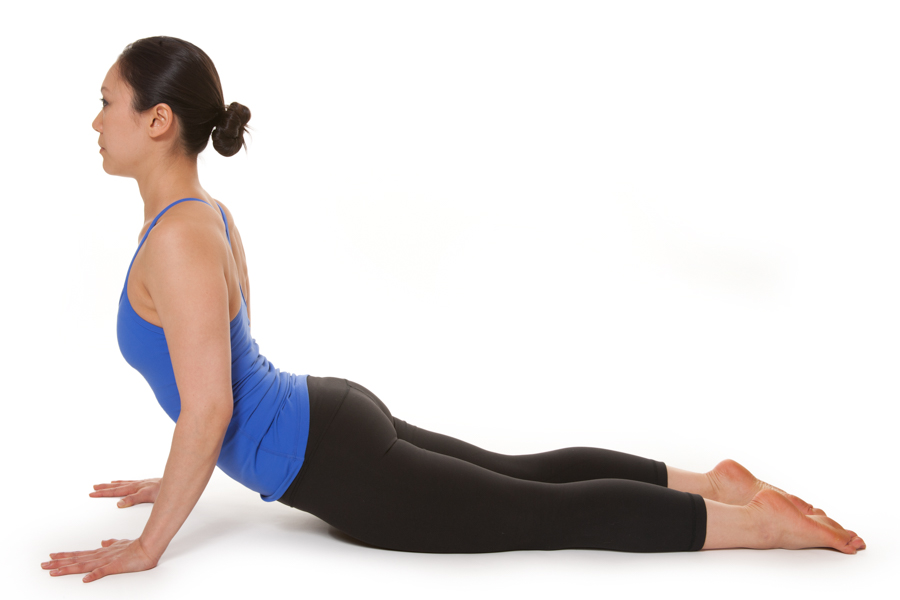 Cobra Pose is one of the fundamental poses included in most forms of Hatha Yoga from gentle to strenuous. How high you can lift your chest off the floor depends on upper body strength and spinal flexibility. Like all yoga poses, listen to your body to prevent injury. Your upper body strength and spinal flexibility will increase with regular practice.
English Name: Cobra
Sanskrit Name: Bhujangasana
Difficulty Level: 4
Start Position: Lying on stomach
Instructions:
Step 1.
Place both hands under your shoulders.
Step 2.
Slowly straighten your arms to lift your chest. Gaze forward.
Step 3.
Keep your thighs, legs, and feet flat on the floor.
Step 4.
Maintain the pose as long as it feels comfortable. Breath slowly and evenly. When you are ready, return to the start position. Repeat if desired.
Physical Benefits:
- Improve posture
- Opens up the chest, shoulders and throat
- Lengthens the spine
- Improves spinal flexibility
- Strengthens lower back, shoulder, arms and legs
- Reduce fatigue
Mental Benefits
- Improves focus
- Relieve mild anxiety and depression
- Reduces stress
Contraindications:
- Pregnancy
- High blood pressure
- Back or hip injury
- Shoulder or arm injury
- Wrist or hand
- Neck injury
Extended Child
- At June 07, 2022
- By Daniel
- In Asana, Education, Health & Wellness, Yoga Benefits
 0
0
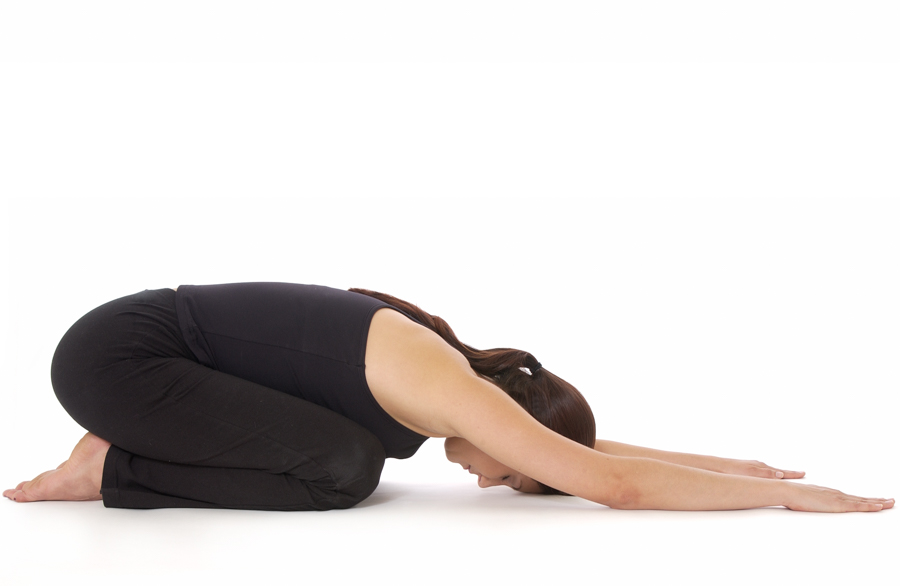 Extended Child Pose has the same physical and mental health benefits as Child Pose. Like Child Pose, Extended Child Pose is a resting pose.
English Name: Child
Sanskrit Name: Utthita Balasana
Difficulty Level: 1
Start Position: Child
Instructions:
Step 1.
From Child Pose, extend your arms in front of you with your palms flat on the floor.
Step 2.
Remain in the pose as long as it feels comfortable. Return to Child or Kneeling pose. Repeat if desired.
Physical Benefits:
- Stretches spine, ankles, knees and hips.
- Reduce head, neck and chest pain.
- Opens the low back and hips.
Mental Benefits
- Calms the mind.
- Reduces anxiety and stress.
- Reduces fatigue.
Contraindications:
- Pregnancy (keep knees apart and prevent abdominal pressure.)
- Knee, ankle or hip injury
- Shoulder injury.
Child Pose (Balasana)
- At May 03, 2022
- By Daniel
- In Asana, Education, Health & Wellness, Yoga Benefits
 0
0
 Child Pose is a resting pose. You can go into Child Pose at any time; before, during, or after a class.
If an asana does not keel comfortable, like Downward Facing Dog, you can rest by going into Child Pose. If a yoga class is more strenuous than you expected or for your physical condition, spend a few minutes in Child Pose.
You can do Child Pose anytime you feel the need to take a break and calm your mind.
English Name: Child
Sanskrit Name: Balasana
Difficulty Level: 1
Start Position: Kneeling
Instructions:
Step 1.
From kneeling pose, bend forward from the waist maintaining a straight back.
Step 2.
Touch your forehead to the floor.
Step 3.
Place your arms alongside your body with your palms up.
Step 4.
Remain in the pose as long as it feels comfortable. Return to Kneeling pose. Repeat if desired.
Physical Benefits:
- Stretches spine, ankles, knees and hips.
- Reduce head, neck and chest pain.
- Opens the low back and hips.
Mental Benefits
- Calms the mind.
- Reduces anxiety and stress.
- Reduces fatigue.
Contraindications:
- Pregnancy (keep knees apart and prevent abdominal pressure.)
- Knee, ankle or hip injury
Chair Pose
- At April 05, 2022
- By Daniel
- In Asana, Education, Health & Wellness
 0
0
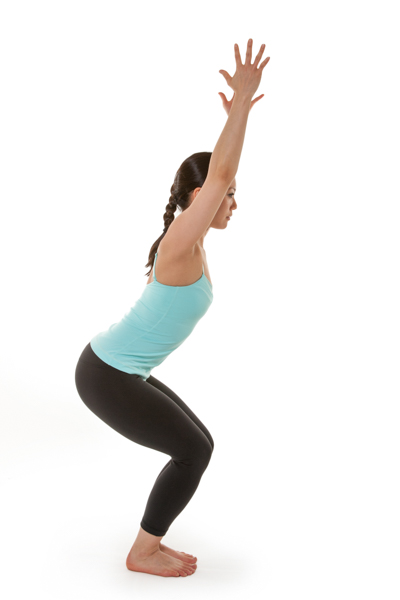 Chair Pose is a simple balance pose included in many Hatha Yoga classes from gentle to vigorous.
While Chair Pose looks simple, it can be challenging if you have any of the contraindications listed below.
While improving balance, Chair pose strengthens knees and ankles and stretches the spine.
English Name: Chair
Sanskrit Name: Utkatasana
Difficulty Level: 3
Start Position: Mountain
Instructions:
Step 1.
Bend your knees until your thighs are about 45 degrees to the floor.
Step 2.
Swing your arms up over your head energizing your hands and fingers. Gaze forward or at the floor.
Step 3.
Remain in the pose 15 to 30 seconds or as long as it feels comfortable, and then return to Mountain pose. Repeat if desired.
Physical Benefits:
- stretches the spine.
- Strengthens legs, feet, ankles, calves, thighs and buttocks
- Opens up the chest
- Improves circulation
- Improves digestion
Mental Benefits
- Increases focus
- Reduces stress
- Relieves mild anxiety
- Stimulates the mind
Contraindications:
- Low blood pressure
- Insomnia
- Knee, ankle or hip injury
- Shoulder injury
Camel Pose
- At March 01, 2022
- By Daniel
- In Asana, Health & Wellness
 0
0
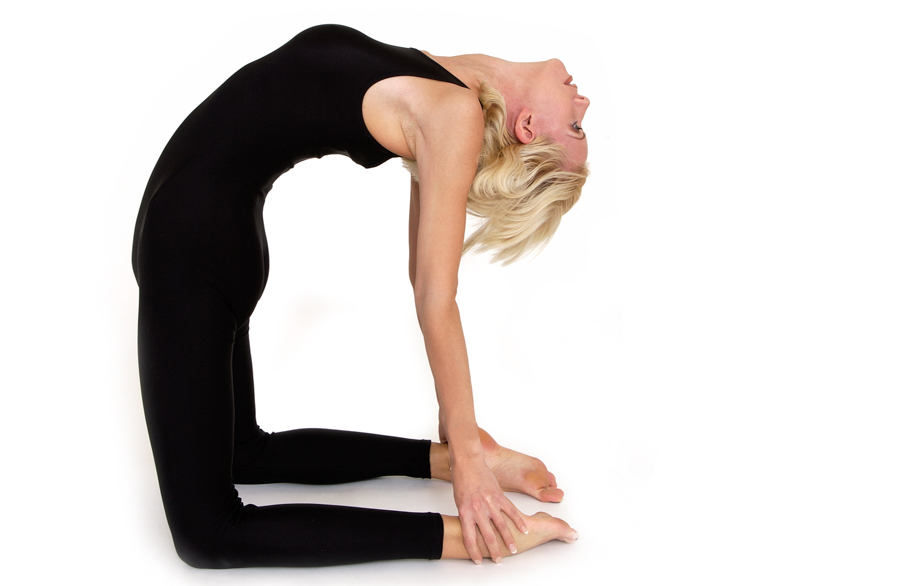 Camel Pose is a popular Hatha Yoga back bending pose. While it looks simple, it can be challenging for beginners and anyone with limited flexibility.
If you cannot grab your heels or feet, you can rest your hand on blocks until you develop the flexibility to perform the pose. Like every asana, listen to your body. You cannot obtain the mental and physical benefits if you push yourself too far too fast and injury your body.
English Name: Kneeling
Sanskrit Name: Ustrasana
Difficulty Level: 6
Start Position: Kneeling
Instructions:
Step 1.
Come up onto your knees with your feet flat on the floor
Step 2.
Bend back and reach for your heels. Keep your hips above your knees.
Step 3.
Lean your head back stretching your knee or keep your chin tucked into your neck.
Step 4.
Remain in the pose as long as it feels comfortable, and then return to kneeling pose. Repeat if desired.
Physical Benefits:
- Opens up the hips
- Stretches thigh, chest, shoulder and throat
- Improves circulation
- Strengthens legs, pelvis and lower back
- Increases spine, torso and arm flexibility
Mental Benefits
- Stimulates the mind
- Reduces stress
- Relieves mild anxiety
- Relieves mild depression
Contraindications:
- Neck injury
- Back or spine injury
- Low blood pressure
- Shoulder injury
- Knee injury

